
☁️Self Hosting Architecture
To host your own application, the first step is having an IP address assigned to your machine. However, many ISPs provide dynamic IP addresses that change periodically, making it difficult for others to access your server. With IPv4, routers use NAT, requiring port forwarding to allow incoming traffic, which poses security risks. IPv6 removes the need for NAT, allowing direct access to your device, but ISPs may still employ NAT or other restrictions. Despite these challenges, hosting a server is possible with proper configuration and security practices, though using a static IP or VPS is often a more reliable option.
🌎Having a DNS

When hosting a service, it’s important for users to easily access your server. The Domain Name System (DNS) helps by translating domain names (like example.com) into IP addresses, acting like the internet's phonebook. By setting up a DNS record for your domain, users can access your application using a name instead of an IP address.
For those with dynamic IPs, Dynamic DNS (DDNS) can be used to automatically update DNS records whenever the IP changes, ensuring your domain always points to the correct address. While you could host your own DNS, it's generally not recommended, and services from providers like GoDaddy offer a more practical and reliable solution for managing DNS.
⚠️The Problem with a static IP!
When hosting your own application, there are several potential threats to be aware of if you directly expose your IP or through a DNS.
- Vulnerability to Scanning Attacks: If your server is directly accessible (especially with IPv6), it becomes a target for port scanning and other automated attacks. Attackers can probe your system for open ports and vulnerabilities to exploit. Trust me this happens all the time! (I will show how later)
- DDoS Attacks: Hosting your own application also makes you a potential target for Distributed Denial of Service (DDoS) attacks. In a DDoS attack, an overwhelming amount of traffic is sent to your server, potentially causing it to crash or become unavailable. This can disrupt your service, damage your reputation, and require costly mitigation efforts.
It's crucial to implement proper security measures, such as firewalls, access controls, and regular monitoring, to protect against these risks.
✔️Reverse Proxy to the rescue!
A great way to protect your server is by using a reverse proxy. Instead of exposing your server's IP directly, you expose the reverse proxy's IP. Services like Cloudflare can automatically manage and rotate the proxy IP, adding an extra layer of security.
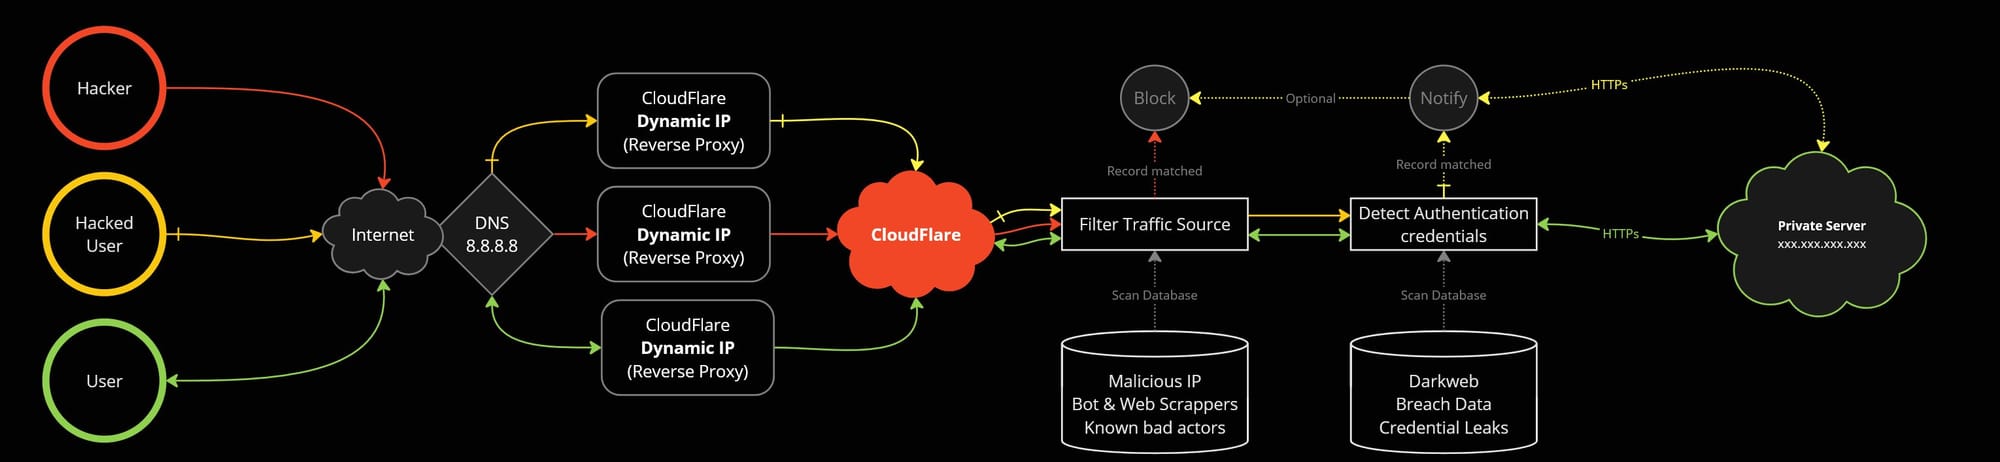
Cloudflare can also help by blocking malicious actors and bots, protecting your server from unwanted traffic. Additionally, it can scan authentication requests for leaked credentials, notifying you of potential breaches and even blocking users, if their credentials are compromised.
This helps safeguard your application while minimizing exposure to threats.
🗝️Securing your sever!
While Cloudflare provides many security features for free, some advanced options, such as authenticated HTTP origin pulls, require additional configuration. One effective way to secure your server is by setting up a single reverse proxy as the entry point and restricting access to only port 443 (HTTPS). By using a reverse proxy like Caddy, you can further enhance security by allowing connections only from Cloudflare's IP addresses and blocking any traffic from other sources. This setup ensures that your server remains protected from unauthorized access.
☁️Access Your Apps Through Reverse Proxy
With a reverse proxy, incoming traffic can be directed to specific services based on subdomains or url paths or anything for that matter. For example:
# Global configuration for rejecting non-remote IPs
@notRemoteIps {
not {
import /root/reverse-proxy/cloudflare-proxies-remote
}
}
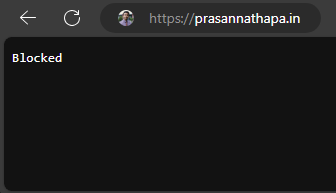
# Default response for non-remote IPs
respond @notRemoteIps 403 {
body "Blocked"
}
# Main domain
prasannathapa.in {
reverse_proxy :1000 {
import /root/reverse-proxy/cloudflare-proxies-trusted
}
}
# Redirect www to the main domain
www.prasannathapa.in {
redir https://prasannathapa.in
}
# Wealth app subdomain
wealth.prasannathapa.in {
reverse_proxy :1001 {
import /root/reverse-proxy/cloudflare-proxies-trusted
}
}
# Wealth API subdomain
wealth-api.prasannathapa.in {
reverse_proxy :1002 {
import /root/reverse-proxy/cloudflare-proxies-trusted
}
}
# Gradecard subdomain
gradecard.prasannathapa.in {
reverse_proxy :1003 {
import /root/reverse-proxy/cloudflare-proxies-trusted
}
}
# Proxy subdomain
proxy.prasannathapa.in {
reverse_proxy :1004 {
import /root/reverse-proxy/cloudflare-proxies-trusted
}
}
# Photos subdomain
photos.prasannathapa.in {
reverse_proxy :3000 {
import /root/reverse-proxy/cloudflare-proxies-trusted
}
}
# Cloud (Nextcloud) subdomain
cloud.prasannathapa.in {
redir /.well-known/carddav /remote.php/dav/ 301
redir /.well-known/caldav /remote.php/dav/ 301
reverse_proxy :3001 {
import /root/reverse-proxy/cloudflare-proxies-trusted
}
header {
# Enable HSTS with a max-age of 6 months (15552000 seconds)
Strict-Transport-Security "max-age=15552000; includeSubDomains; preload"
# Additional recommended security headers
X-Content-Type-Options "nosniff"
X-Frame-Options "SAMEORIGIN"
Referrer-Policy "no-referrer"
X-XSS-Protection "1; mode=block"
}
}
# Blog subdomain
blog.prasannathapa.in {
reverse_proxy :2000 {
import /root/reverse-proxy/cloudflare-proxies-trusted
}
}
Caddyfile
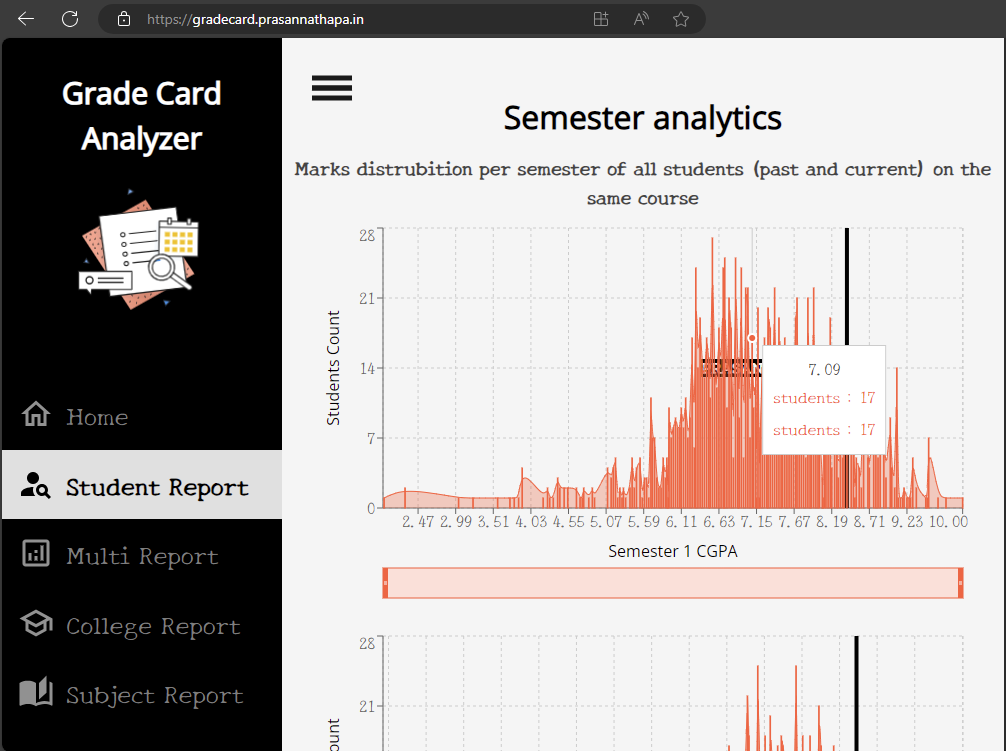
This will help us achieve something like this
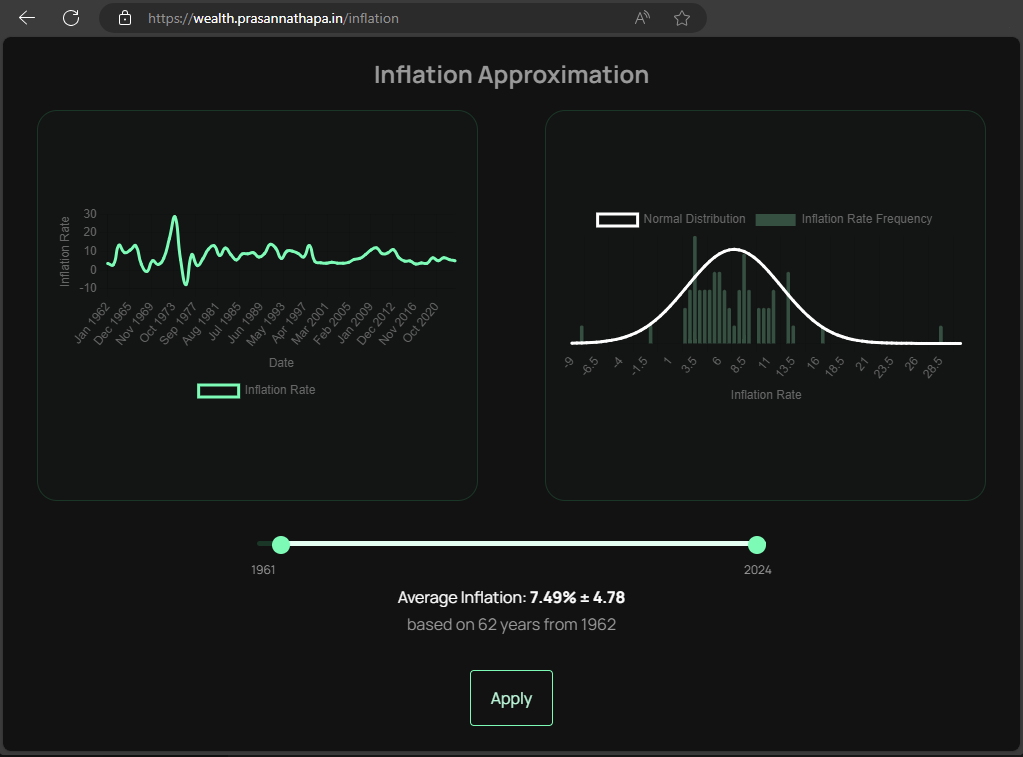
2) https://wealth.prasannathapa.in will redirect to your first web app.
3) https://gradecard.prasannathapa.in will serve your second app.
Allowing only Cloudflare IPs
You can create a Cron job in Linux that will regularly update Cloudflare IPs
#!/bin/bash

# URL for Cloudflare's IPv4 IP ranges
CLOUDFLARE_IPSV4="https://www.cloudflare.com/ips-v4"

# Files to store the Cloudflare IPv4 IP ranges
FILE_TRUSTED_IPV4="/reverse-proxy/cloudflare-proxies-trusted"
FILE_REMOTE_IPV4="/reverse-proxy/cloudflare-proxies-remote"

# Remove old files if they exist

if [ -f "$FILE_TRUSTED_IPV4" ]; then
    rm "$FILE_TRUSTED_IPV4"
fi

if [ -f "$FILE_REMOTE_IPV4" ]; then
    rm "$FILE_REMOTE_IPV4"
fi

# Check if curl is installed and fetch the Cloudflare IPs
if [ -f /usr/bin/curl ]; then
    # Fetch IPv4 addresses for trusted proxies
    HTTP_STATUS=$(curl -sw '%{http_code}' -o $FILE_TRUSTED_IPV4 $CLOUDFLARE_IPSV4)
    if [ "$HTTP_STATUS" -ne 200 ]; then
        echo "FAILED. Reason: unable to download IPv4 list for trusted proxies [Status code: $HTTP_STATUS]"
        exit 1
    fi

    # Fetch IPv4 addresses for remote clients
    HTTP_STATUS=$(curl -sw '%{http_code}' -o $FILE_REMOTE_IPV4 $CLOUDFLARE_IPSV4)
    if [ "$HTTP_STATUS" -ne 200 ]; then
        echo "FAILED. Reason: unable to download IPv4 list for remote clients [Status code: $HTTP_STATUS]"
        exit 1
    fi
else
    echo "FAILED. Reason: curl wasn't found on this system."
    exit 1
fi


# Format the files by joining lines with spaces
sed -i ':a;N;$!ba;s/\n/ /g' $FILE_TRUSTED_IPV4
sed -i ':a;N;$!ba;s/\n/ /g' $FILE_REMOTE_IPV4

# Add the respective prefixes to the files
sed -i '1s/^/trusted_proxies /' $FILE_TRUSTED_IPV4
sed -i '1s/^/remote_ip /' $FILE_REMOTE_IPV4

# Reload Caddy to apply the updated configuration
caddy reload --config /reverse-proxy/Caddyfile
bash script
To run this .sh file as a cron job every 30 minutes in Linux, follow these steps:
1. Open the Crontab Editor
Run the following command in the terminal:
crontab -e2. Add the Cron Job
In the editor, add the following line to schedule your .sh file to run every 30 minutes:
*/30 * * * * /path/to/your/script.shSave and Exit
- If using
nanoas the editor, pressCtrl+Oto save andCtrl+Xto exit.
4. Ensure Script Permissions
Make sure the script is executable:
chmod +x /path/to/your/script.sh
4. Ensure Script Permissions
Make sure the script is executable:
🐋Reverse SSH Tunnels using Docker
to connect you container so that for heavy CPU and GPU based applications like Immich and Nextcloud you provide your own hardware and make it available globally, you can make a Reverse SSH tunnel as a container in Docker that internally runs and only connect to your remote server and will be served from there.
If you want for tighter security that from your home network no one can snoop in and tract http calls you can use
ssh -o StrictHostKeyChecking=no -i /root/.ssh/id_rsa -R -N -p 4765 127.0.0.1:3000:immich:30001 user@remote_serverand do not open port to your host network in docker file
If your home network is secure, you can open expose a port like this
ports:
  - '2283:2283'
it will make your app available in localhost as well.
Step 1
Generate the Key Pair: Run the following command:
ssh-keygen -t rsa -b 4096 -C "[email protected]"Press Enter When Prompted for a Passphrase:
When asked for a passphrase, simply press Enter twice to skip it.
Enter file in which to save the key (/home/youruser/.ssh/id_rsa): [Press Enter]
Enter passphrase (empty for no passphrase): [Press Enter]
Enter same passphrase again: [Press Enter]
Locate Your Keys: After successful generation:
- Private Key:
~/.ssh/id_rsa - Public Key:
~/.ssh/id_rsa.pub
Step 2
Adding the Key to a Remote Server
- Copy the public key to the remote server:
ssh-copy-id username@remote_host
Step 3
Add your custom tunnel container to Reverse tunnel into your server
Now in your add a extra docker container to your docker compose (both Immich and next cloud for example)
tunnel:
    image: 'alpine:latest'
    container_name: immich_tunnel
    entrypoint:
      - sh
      - '-c'
      - >-
        apk add --no-cache openssh &&
        ssh -o StrictHostKeyChecking=no -i /root/.ssh/id_rsa
        -N ${SSH_PORT}  -R
        127.0.0.1:3000:immich_server:3000
        root@${PUBLIC_SERVER_IP}
    volumes:
      - '${SSH_RSA_PRIVATE_KEY_LOCATION}:/root/.ssh/id_rsa:ro'
    env_file:
      - .env
    restart: unless-stopped
It will create a tunnel connecting ports 3000 between your server and local machine, and it will start along with the docker compose up
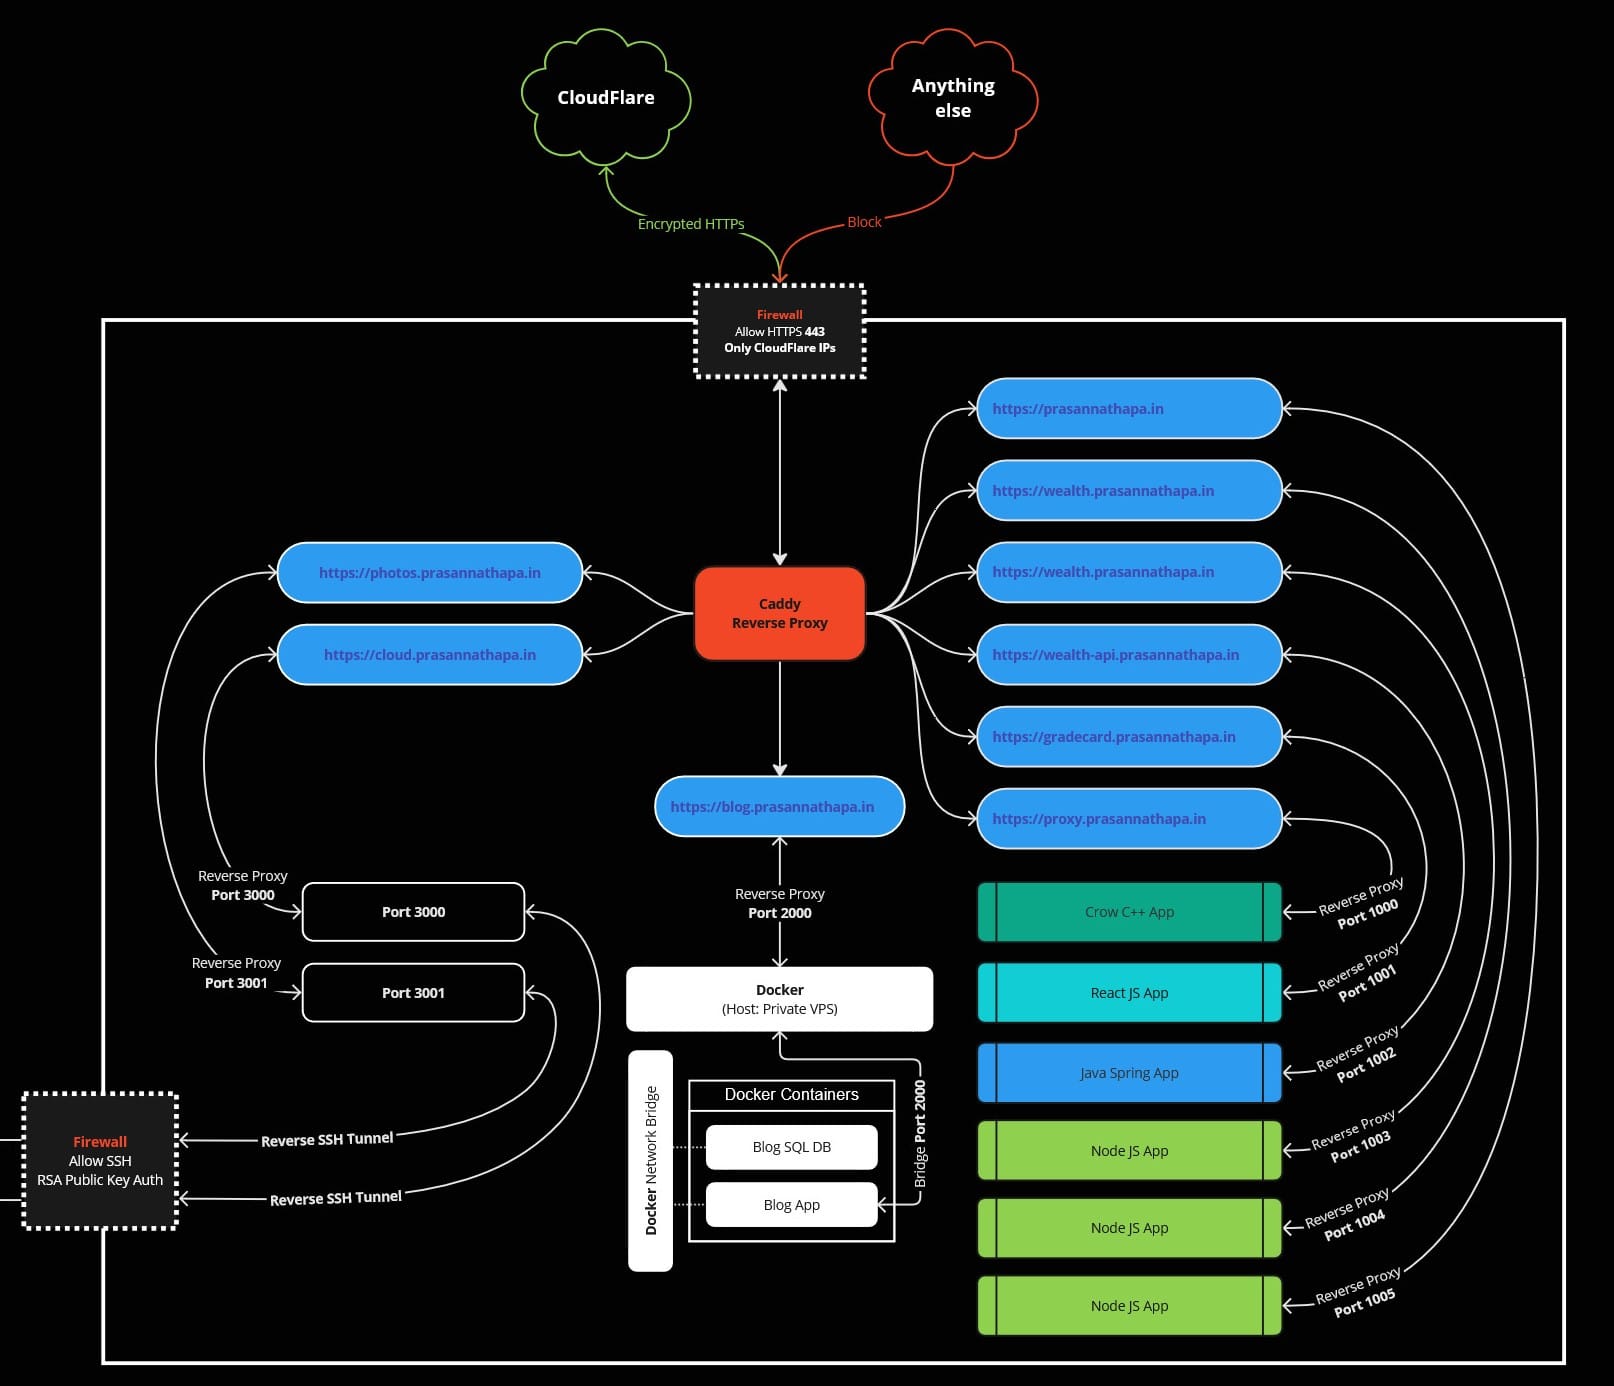
Once done your final setup will look like this
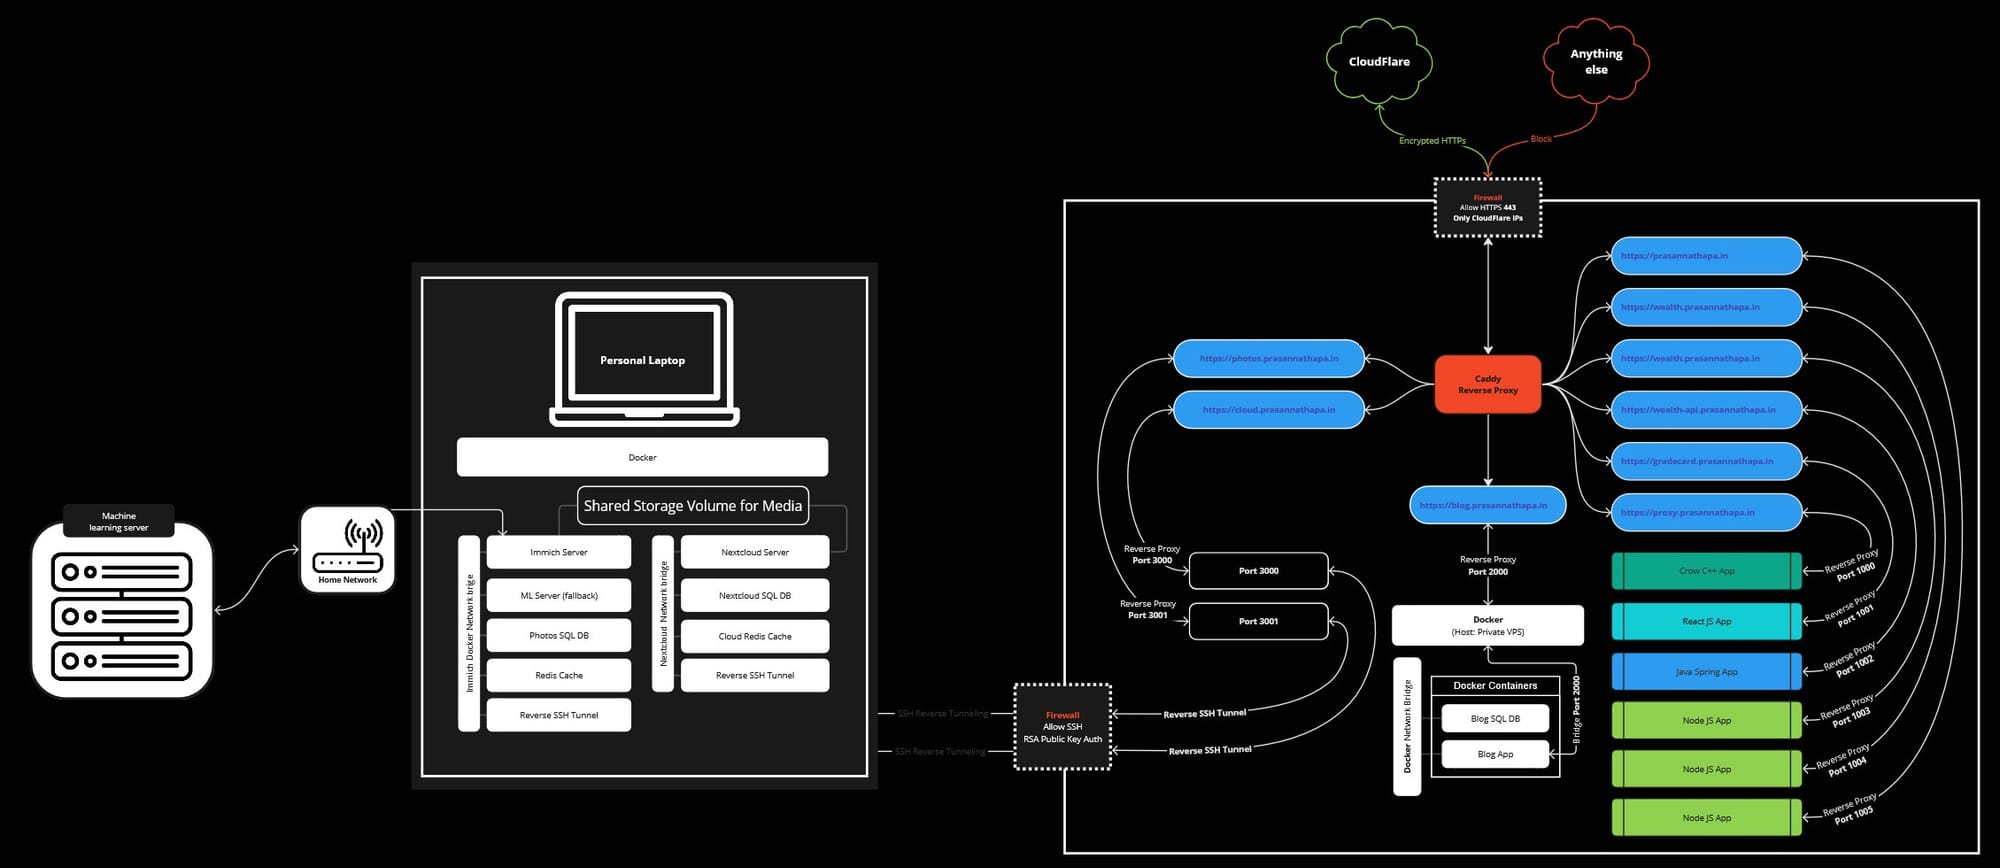
Conclusion
🔒Security Benefits
- The multi-layered security approach combines Cloudflare's reverse proxy, Caddy's HTTPS enforcement, and RSA key-based SSH authentication to create a robust defense system that goes beyond standard security practices.
- Docker containers running without exposed ports, managed through a dedicated tunneling container, ensure that services remain accessible only through properly authenticated and encrypted channels.
- The use of non-standard ports for SSH tunnels, while not a primary security measure, adds an extra obstacle for potential attackers when combined with proper security protocols.
💸Cost Optimization
- By leveraging your home machine's computing power for resource-intensive applications like Immich and NextCloud, you significantly reduce the need for expensive VPS instances.
- The reverse tunnel setup allows you to maintain professional-grade service accessibility through a modest VPS while running demanding applications on more powerful home hardware.
🤩Architecture Advantages
- The subdomain-based routing through Cloudflare not only enhances security but also provides clean, professional URLs for all your services.
- The combination of Caddy's automatic HTTPS certification and Cloudflare's proxy services ensures encrypted connections throughout the entire communication chain.
- The dedicated tunneling container with mounted RSA keys streamlines the secure connection process while maintaining strong authentication standards.
❗Security Risks and Disadvantages
- Zero-day vulnerabilities in applications like Immich or NextCloud could potentially expose your local machine to attacks, as you're essentially creating a bridge between the internet and your home network.
- Development projects and testing environments should never be exposed through this setup unless properly sandboxed, as they often contain unpatched vulnerabilities or security misconfigurations.
- Running services on your local machine means exposing it to potential threats:
- Compromised applications could access other files or services on your machine
- Attackers could potentially pivot from a compromised application to other parts of your home network
- Personal or sensitive data on your local machine could be at risk if an application is compromised
- Network dependencies create additional points of failure:
- Internet outages at your home will make services inaccessible
- VPS or Cloudflare downtime will affect service availability
- SSH tunnel disconnections require automatic re-connection handling
🌟Key Takeaways
- This setup demonstrates that proper security and cost efficiency can coexist without compromising either aspect.
- The layered approach ensures that even if one security measure is compromised, multiple backup layers continue to protect your services.
- Carefully evaluate the risks versus benefits before exposing any service, especially when running on non-sandboxed personal machines.
- Consider implementing additional security measures such as:
- Regular security audits and updates
- Network segmentation for exposed services
- Intrusion detection systems
- Regular backup systems
- Monitoring and logging solutions